Saturday, June 25, 2011
We've moved!
Friday, May 13, 2011
Want Better Images? Read this now.
Whether you shoot film, digital or both a gray card is a very important tool to own and use. The older style gray cards, made by Kodak and others, are designed for setting exposure. A camera's exposure meter (aka "light meter") is based on a standard. If it weren't then we'd have to experiment with every camera and meter to figure out what the meter was really telling us. The standard that was agreed to many years ago, is called 18% "reflectance", or 18% gray or "middle" gray. **** 18% is a middle tone in photography because our exposures are based on "stops" which double or halve the amount of light. So exposure is logarithmic and not linear.When you hold an 18% reflectance card in front of the camera, it is reflecting exactly the right amount of light that your meter is "tuned" to. A lighter card would cause you to underexpose (the meter would try to make it darker) and a brighter card would make you overexpose (the meter would tell you how to make it lighter). The same is true for any "scene" you aim the camera at. If the scene is bright, your indication will be underexposed, and a dark scene gets overexposed. By pointing to a standardized middle tone, the meter always gives you the correct exposure.The newer type of gray cards are designed for setting white balance. They tend to be a bit lighter than an exposure card, so you wouldn't use it to set the exposure. Instead, it is made to reflect the three primary colors of light equally, so that any light bouncing off of it will show the color of the light. You've probably taken a shot indoors and noticed it looks orange (or amber) or outdoors in shade and noticed the color was too blue. A gray card will let you capture the right color of the scene.All digital SLR's have White Balance presets. Examples are Daylight, Cloudy, Shade, Fluorescent and Incandescent (or Tungsten). These have preset Kelvin temperatures that professionals use to measure the "color" of light. Blue light outdoors has a higher Kelvin temp than a tungsten, or incandescent, light indoors. Setting the Kelvin temp in the camera to match the temperature of the light gives you the truest color.Since the presets are often a few hundred degrees apart, the light may not fit exactly into a preset setting. For example, if you shoot with normal household lights, they burn at 2600K (or so depending on the make an wattage) and the Incandescent (or Tungsten) preset is set for 3200K lamps used professionally in studios and movie sets. So while the colors will be close to real, they aren't exactly right. Using a digital gray card to set the Kelvin temperature in camera (or later in post when shooting RAW) lets you match exactly to the true Kelvin temperature of the light, and therefore gives you the truest color of the subject.Don't spend a lot on a collapsible reflector style tool to set WB or exposure. Instead, get a Kodak (or Delta) card for exposure and a Robin Myers Imaging, WhiBal, Digital Gray Kard (or similar) for white balance. The Photovison targets have a good middle tone for exposure, but the color is not truly neutral for white balance. Save your money.Matthew L KeesDirector of MLKstudios.comApril 18, 2011
Friday, April 22, 2011
week 5 Winners!!!
Friday, April 15, 2011
Fabulous Week 5!!
Our next amazing vendor is Gracie's Garden. You can check out her shop HERE. She has some of the most amazing and cute hats I have seen in a long time! So gorgeous! She is offering an amazing $50.00 credit to her store! Can you believe it?!!

With so many craftsmen, artists, chefs, innovators, and inventors in Colorado, I saw a need for a gathering place to bring these talented small business owners together with consumers looking for these products. Colorado is a favorite vacation destination for travelers word-wide. CompletelyColorado.com is a great way to bring home a taste of that amazing vacation!
For shoppers, CompletelyColorado.com is your source for a $6 jar of Molicious Mustard to a beautiful 18k gold hand-carved Rocky Mountain ring priced at $1,299…and everything in between. We actively seek artisans who use eco-friendly materials, use organic ingredients or upcycle. Check back often, as we are continuously to building our catalog!" 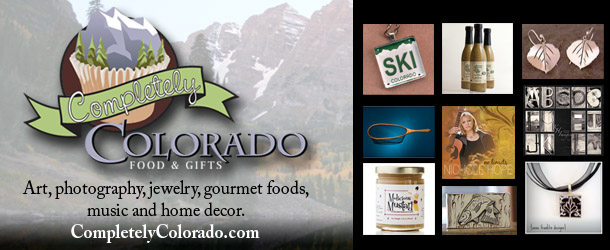

Winner Winner week 4!!!!
and now for the winners.... :) :)
The winner of everything.... is..................
................
...........
..............
hehehe
Heather Johnson Millett
The winner of one action set of their choice is
...............
Melanie Weiss Catalano
email us at purephotoshopactions@gmail.com to claim your prizes :)
Now.... onto week 5 of the giveaway!!!!
Friday, April 8, 2011
Week 4 GIVEAWAY!!
So, now, 4 weeks later with 15K fans, we are even more excited about introducing our vendors. We hope that you will be as excited as we are to like them. Also, due to the number of vendors we have participating, we will be extending it to a Week 5! Which means good things for our fans who are entering!
Ok, how do you win? Good question. It is simple! You need to fan each of the vendors on their Facebook page and then come back here and let us know! It is THAT simple. We will then select a random winner for all of the amazingness posted here, and a second winner gets to select one of our single action sets! How cool is that?
Let's get to the good stuff!
Our first vendor really needs no introduction. Sassy Designs, Ltd. is an amazing purveyor of awesome digital papers, templates, and cuteness. They are perfect for the photographer making cards to sell clients for holidays, but they work equally as well for the non-pro who just loves digital scrapbooking. Sassy is offering a $150 gift certificate to her shop to the winner. What a HUGE, awesome prize!!


Week 3 Winner Winner Chicken Dinner :)
Ashley Hiss Grogg (winner of the prizes from the amazing vendors)
and
Stacie Shular (an action set of your choice)
email us at purephotoshopactions@gmail.com to claim your prize :)
Tuesday, April 5, 2011
Thank you for being such amazing fans!!!


Friday, April 1, 2011
Our Big Celebration and Giveaway--Week 3
Week 2--Winner!!
Thursday, March 24, 2011
10K Fans and a HUGE giveaway--Week 2
To Fan the pages... make sure you right click their name and select view in new tab or window so you don't leave our blog... :) Then fan their page and let them know we sent you!!! Shout out the giveaway on your fan pages and make sure you tag @purephotoshopactions in it for another entry!!!
By printing on Fredericks Canvas™ our Gallery Wraps are Archival Safe, have a Color Match Guarantee and are made in the U.S.A.
The Color Match Guarantee simply means that the colors on any canvas print will match the colors of the same image on a standard print - 4x6, 8x10, wallets, etc.
If you have an image that comes close to the edge of your wrapped canvas, there is no need to worry! Our experienced team of digital artists will apply our digital side stretching service to ensure that the image is showcased on the front of the canvas.
Lil' Sweet Prince is our next vendor and they have been designing all kinds of special occasion cards for many years now, and their experience shines through. Their cards are top notch and their designs are beautiful. Vanessa says of her shop:
Inspired by the creative chaos that comes from working at home with their little inspirations running around, and with sophistication, style and the sense of humor needed to tackle a full work-day while toting around their tots, this design-savvy team creates superbly stylish photo cards and elegant announcements. The collaborative team behind Lil Sweet Prince creates snapshots of family life that are filled with laughter, joy, and love.
Our next vendor is Nicolette of Love That! Crochet. Her designs are so cute and fun that everyone who sees her talent will certainly be saying, "Love that!!" Her shop has quite a few offerings, so check out her stuff. So adorable!
Amanda of alb|photography is donating the cutest little items! She is donating a headband and (get this!!) a TOP HAT headband! Having recently given birth to a boy, I love that boys are not being left out of the adorable headband craze!! Awesome!!! You have to check this out!
Wednesday, March 23, 2011
Attention Photoshop Users!!! New Upgrade :)
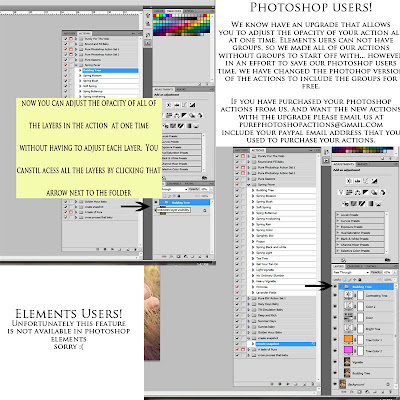
Photoshop users!
We now have an upgrade that allows you to adjust the opacity of your action all at one time. Elements uers can not have groups, so we made all of our actions without groups to start off with. However in an effort to save our Photoshop users time, we have changed the Photohop version of the actions to include the groups for free.
If you have purchased your photoshop actions from us, and want the new actions with the upgrade please email us at purephotoshopactions@gmail.com include your paypal email address that you used to purchase your actions.
Week 1 Winners!
Thursday, March 17, 2011
10K Fans and a HUGE giveaway--Week 1


Friday, March 11, 2011
Amanda Aykroid....come on down!!
Amanda wrote:
"I absolutely love your actions and would LOVE to win a set of these actions for myself. As a foster parent, I try to capture memories of the kids that come in to my care.
Each child whether with me a week or a month or longer, has updated professional photos taken and then candid memories within my home. When the child returns to their parents, I provide the parents an edited CD of the photos of their child while they were in care.
I realize the difficulty it is for most parents to be away from their children and providing this CD allows these parents a chance to fill-in the 'gaps' from days their child was away from them. It also allows me precious memories of the children that have filled my home and warmed my heart.
By choosing me, you will allow me the opportunity to serve these kids, their families, and myself through reduced editing time and GREAT photoshop actions which will provide cherished memories for myself and others.
Thanks for considering me!"
9000 Fans and a Giveaway!!!
Monday, March 7, 2011
We are so excited to announce....
Saturday, February 12, 2011
Using Clipping Masks in Templates
Monday, January 24, 2011
Texture Mania
AND to help you try out your newfound texture skills, we'd love to supply you with the texture from the tutorial...FOR FREE! Hop over to our fan page and check out our new custom Welcome Tab and find the download button and get that freebie texture. Woo!
Friday, January 14, 2011
Winner!
We can't wait to see what you do with them! We'll be emailing them shortly!
Tuesday, January 11, 2011
Blogging template giveaway!
And we want your blogs to be the best they can be! We also want you to be able to keep that New Years' Resolution to blog more.
SO
We are releasing our blogging templates AND we are going to give you 20% off. If you purchase the templates and use the code "BLOG" at checkout, you'll get the discount.
But we love you even more than that. We want you to have a chance at a fun giveaway too! So, how to enter. First go to our newly launched Pure Photography and Design Fan Page for our photography. Fan that page and then come here and comment! (If you came from the Pure Photoshop Actions fan page post, and the link is not working, then just copy and paste http://www.facebook.com/PurePhotographyandDesign this link into your browser OR.... right click the link up top and hit view in new tab and it seems to work that way)
But when you comment, please make sure to leave your full name or a way to contact you if you win. Lots of times we only have a first name and no blogger profile and if one of those entries wins, we have no way to contact the winner and need to choose another, so please make sure that you make it possible for yourself to win!
What will you win? 2 lucky winners will get our full Set 1 of Pure Blogging Templates! You will love them!
So...get entering!
Monday, January 3, 2011
Blogging Templates

Sunday, January 2, 2011
Photo Tip--Thinking like your camera
There are so many options in making an image with a camera now. You can keep all of the control of the camera (this is what Crystal and I (Rachel) do. When people oooh and ahh over our cameras and say, "Wow, those must take GREAT pictures!", we smile and say, "Yep, we taught them everything they know!" ;)), you can keep some of the control of the camera, but let the camera make some decisions, or you can let the camera make the decisions. Each way has pros and cons, and some models of camera will only allow a one or maybe two of these choices. A point and shoot is a good example of a camera that will usually only allow you to let the camera call the shots.
Sigh...so that means you have no control, right? If the picture turns out good, it was all the camera? And if it turns out bad, there was nothing to be done? Should we just sit in the corner and sulk?
Absolutely not! You have a lot more control than you think, even if the camera is on auto mode.
So, we know the camera is looking at the picture you want to take, and SOMEHOW the camera is figuring out what settings to apply to that image. You can't usually SEE those settings, so how can you influence them?
That is where I come in! I am going to show you how your camera thinks! Once we learn this, we can apply it to other lessons. Once you're "at one" with the mind of your camera, you'll be able to have some measure of control in using even a point and shoot camera.
First of all, when a camera looks at a scene that you intend to shoot, it doesn't really see the scene like you do. Say you're shooting your kids at the park on the playground. There's green grass, a red slide, a blue sky. Junior's wearing a yellow shirt. The camera doesn't see that. The camera doesn't see colors. It sees TONES.

The camera sees the scene in gradations of brightness.
Ok, great! But how is it choosing the settings?
Well, the camera is looking at the whole scene you have framed and is averaging the scene to 18% or MIDDLE gray. It wants to pick the settings that will average the frame towards the middle of that pattern.
And lots of times, it works great!
But what if I want to shoot a picture of my kid standing against a black board, writing his name? Or something primarily black? (Or a VERY dark color.)

Is this a middle tone? NO WAY! But guess what? Your camera will let in enough light automatically to make it look 18% gray. So that chalkboard will no longer be black. It will be gray. Oh...and hmm. If that black is moved up the grayscale...then what do you think happens to all those tones (like skin, hair, etc.) that are LIGHTER than the black that has been shoved up the scale? Uh oh. It's not good. They're going to be WAY brighter than they should be. They might even get shoved entirely off the scale, into white nothingness.
We've all had those pictures right? The overexposed ones. ALL the detail is gone. Everything is just an icky, white blob. It looks bad on screen and prints even worse. All the details get shoved into the white category and they are gone forever. Let's all have a moment of silence for our fallen highlights. *sniffle*
Ok, so that's a time where our camera's plan of making everything middle gray has failed us. D'oh!
Let's think of another. And you all know this one too, I bet. Say you're darling and precocious child is sitting in front of the bright window reading a book. It is an ADORABLE picture in your mind. The angelic child is framed by the bright window, it's perfection! But...you take that picture with SO much of it SOOOO bright, and what happens?

The average of this scene is really white. Not middle gray. It's at the TOP of the scale. So, the camera pushes allll that white, bright light down the scale to 18%. And what happens to the child's face, which is pretty much in shadow? It also gets shoved down the scale. Suddenly you can barely make out the child for all of the shadow. Some of the details might even be lost to total blackness. *sniffle* Isn't this story just SO sad??? All of these missing details that we could have had!
By the way, the above technique is a good way to get a silhouette. So if that was what you were planning...a silhouette of junior reading in the window, WOOHOO! (It's always nice to know what you want to do and how to do it.)
Ok, so now we have an idea of what the camera is thinking. How it is trying to read the scene. This will help you choose lighting/color situations that your camera can better handle. (Or you can add flash to help even the exposure. There are pros and cons to using a small flash on your camera, but we'll discuss those later.) One thing that is very hard for a point and shoot is backlight. In general, it is best to steer clear if you want to be able to make out the faces of the people in your picture.
But here's my big tip for how to get a backlit photo with your point and shoot. But first, I have to share a secret. Shhhhh. Your shutter button is a double agent. Shhhhhhh. It lives a secret life. Not only can you push it and it will faithfully release the shutter and take the picture, it can also LOCK THE EXPOSURE!! So, all of what we were talking about above is the basics of making an exposure. We've learned how your camera determines the exposure it will use on automatic. SO now, let's use that knowledge. If you know that you want your child sitting in the window to be properly exposed and you want the window to be bright, then walk up to your child's face and fill most of the frame with it, push your shutter button halfway down and HOLD IT! This will lock what your camera is seeing as middle gray. It is seeing your child's face this way. (Which is technically a little underexposed, but not THAT bad for a snapshot with a point and shoot) Now, back up and frame the picture as you would like to see it (again, keeping that button halfway pressed down.) Now, once you have the picture framed as you'd like it, press the shutter down the rest of the way. VOILA! Your image is now properly exposed! Or a lot closer, anyway. (What can I say? I'm an exposure purist. I can't call 36% gray 18% gray. ;) )
Would it work the same as the child against the blackboard? You bet. Pick what you want to be properly exposed and press that shutter button halfway down and reframe your shot and then press the shutter button the rest of the way.
Now that you know how your camera thinks, you'll be able to start looking at what might happen if your camera is thinking the whole scene needs to be 18% gray. Sometimes it will be perfect, and sometimes it won't, so that is where you can either lock your exposure, add some flash, or change your angle to the light.
